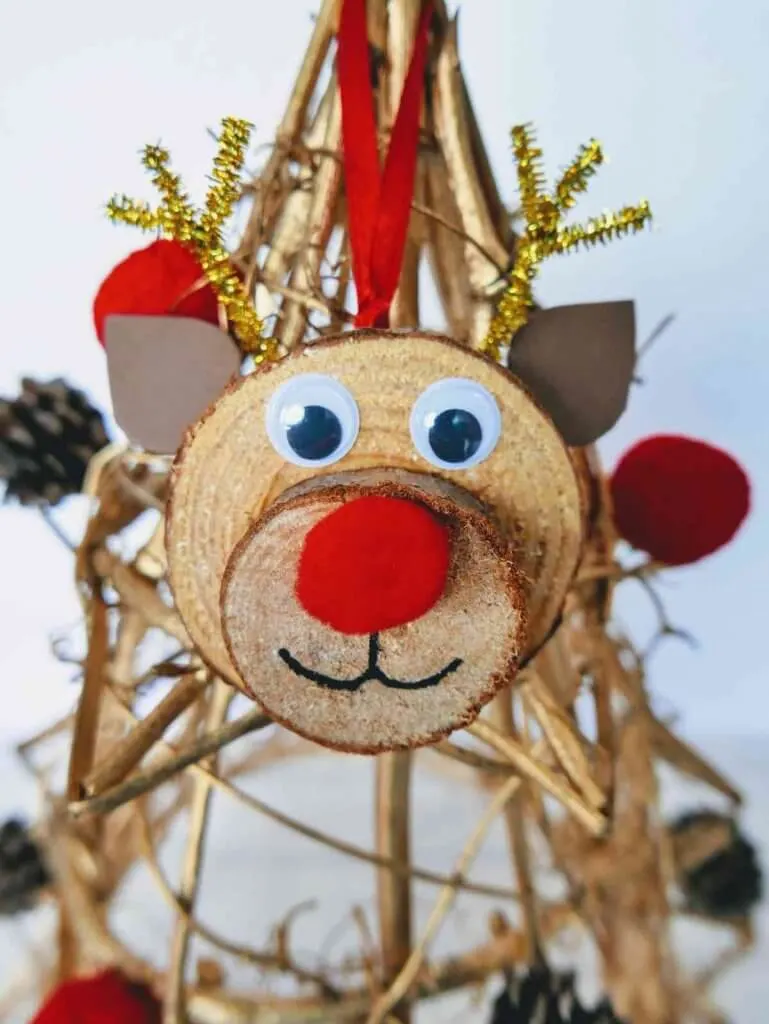
<img decoding=”async” loading=”lazy” width=”683″ height=”1024″ src=”https://www.marcieinmommyland.com/wp-content/uploads/2020/11/Reindeer-Ornaments-683×1024.jpg” alt=”” class=”wp-image-15455″ srcset=”https://www.marcieinmommyland.com/wp-content/uploads/2020/11/Reindeer-Ornaments-683×1024.jpg 683w, https://www.marcieinmommyland.com/wp-content/uploads/2020/11/Reindeer-Ornaments-200×300.jpg 200w, https://www.marcieinmommyland.com/wp-content/uploads/2020/11/Reindeer-Ornaments-768×1152.jpg 768w, https://www.marcieinmommyland.com/wp-content/uploads/2020/11/Reindeer-Ornaments-175×263.jpg 175w, https://www.marcieinmommyland.com/wp-content/uploads/2020/11/Reindeer-Ornaments-450×675.jpg 450w, https://www.marcieinmommyland.com/wp-content/uploads/2020/11/Reindeer-Ornaments.jpg 1000w” sizes=”(max-width: 760px) calc(100vw – 96px), 720px”> Rudolph Ornament s
Level: Easy
Time: 10 minutes
<img decoding=”async” loading=”lazy” width=”1024″ height=”769″ src=”https://www.marcieinmommyland.com/wp-content/uploads/2020/11/DIY-Reindeer-Ornament-Materials-1024×769.jpg” alt=”These are the materials you’ll need to make these DIY reindeer ornaments from wood slices.” class=”wp-image-15432″ srcset=”https://www.marcieinmommyland.com/wp-content/uploads/2020/11/DIY-Reindeer-Ornament-Materials-1024×769.jpg 1024w, https://www.marcieinmommyland.com/wp-content/uploads/2020/11/DIY-Reindeer-Ornament-Materials-300×225.jpg 300w, https://www.marcieinmommyland.com/wp-content/uploads/2020/11/DIY-Reindeer-Ornament-Materials-768×577.jpg 768w, https://www.marcieinmommyland.com/wp-content/uploads/2020/11/DIY-Reindeer-Ornament-Materials-175×131.jpg 175w, https://www.marcieinmommyland.com/wp-content/uploads/2020/11/DIY-Reindeer-Ornament-Materials-450×338.jpg 450w, https://www.marcieinmommyland.com/wp-content/uploads/2020/11/DIY-Reindeer-Ornament-Materials-1170×878.jpg 1170w, https://www.marcieinmommyland.com/wp-content/uploads/2020/11/DIY-Reindeer-Ornament-Materials.jpg 1000w” sizes=”(max-width: 760px) calc(100vw – 96px), 720px”>
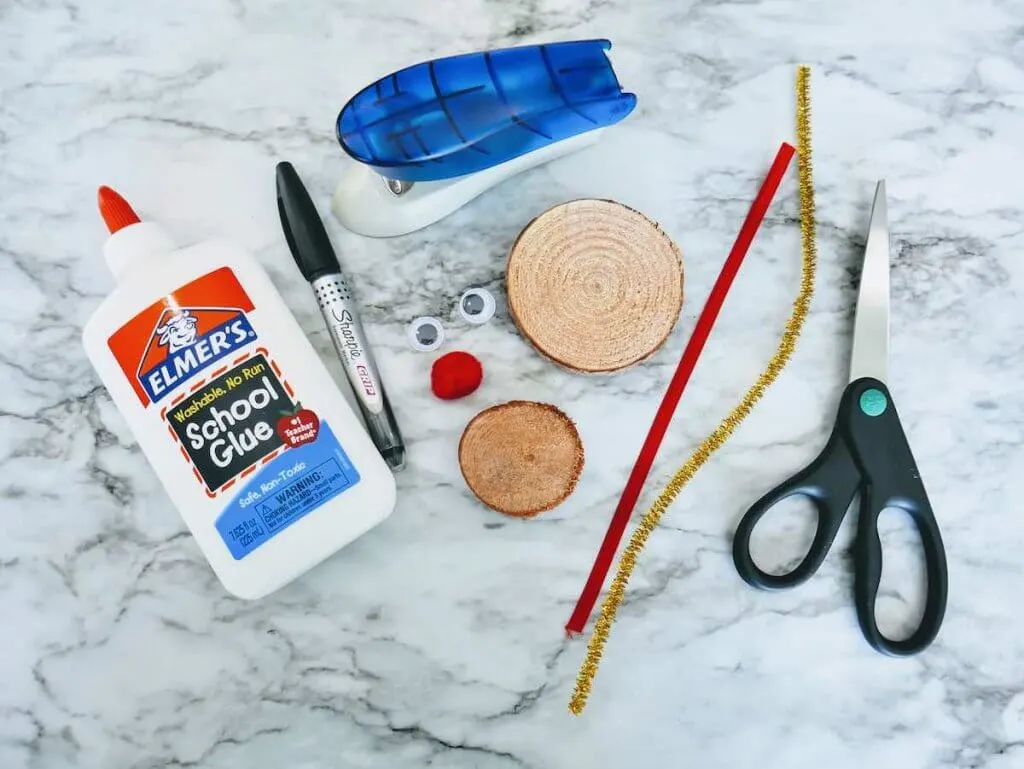
Reindeer Wood Slice Ornament Materials Needed: DIY Reindeer Ornaments with Wood Slices Tutorial
Fold the ribbon in half and place the ends on the back of the large wood slice.
<img decoding=”async” loading=”lazy” width=”769″ height=”1024″ src=”https://www.marcieinmommyland.com/wp-content/uploads/2020/11/DIY-Reindeer-Ornament-Step-1b-769×1024.jpg” alt=”How to make a DIY Christmas ornament step 1. Image of a wooden slice with a red ribbon.” class=”wp-image-15433″ srcset=”https://www.marcieinmommyland.com/wp-content/uploads/2020/11/DIY-Reindeer-Ornament-Step-1b-769×1024.jpg 769w, https://www.marcieinmommyland.com/wp-content/uploads/2020/11/DIY-Reindeer-Ornament-Step-1b-225×300.jpg 225w, https://www.marcieinmommyland.com/wp-content/uploads/2020/11/DIY-Reindeer-Ornament-Step-1b-768×1023.jpg 768w, https://www.marcieinmommyland.com/wp-content/uploads/2020/11/DIY-Reindeer-Ornament-Step-1b-1153×1536.jpg 1153w, https://www.marcieinmommyland.com/wp-content/uploads/2020/11/DIY-Reindeer-Ornament-Step-1b-175×233.jpg 175w, https://www.marcieinmommyland.com/wp-content/uploads/2020/11/DIY-Reindeer-Ornament-Step-1b-450×599.jpg 450w, https://www.marcieinmommyland.com/wp-content/uploads/2020/11/DIY-Reindeer-Ornament-Step-1b-1170×1558.jpg 1170w, https://www.marcieinmommyland.com/wp-content/uploads/2020/11/DIY-Reindeer-Ornament-Step-1b.jpg 1000w” sizes=”(max-width: 760px) calc(100vw – 96px), 720px”>
Open a stapler, and place it flush against the ribbon, and staple it to the top of the wood slice.
<img decoding=”async” loading=”lazy” width=”769″ height=”1024″ src=”https://www.marcieinmommyland.com/wp-content/uploads/2020/11/DIY-Reindeer-Ornament-Step-2b-769×1024.jpg” alt=”How to make a DIY reindeer ornament step 2. Image of a blue stapler stapling the red ribbon to the wood slice.” class=”wp-image-15434″ srcset=”https://www.marcieinmommyland.com/wp-content/uploads/2020/11/DIY-Reindeer-Ornament-Step-2b-769×1024.jpg 769w, https://www.marcieinmommyland.com/wp-content/uploads/2020/11/DIY-Reindeer-Ornament-Step-2b-225×300.jpg 225w, https://www.marcieinmommyland.com/wp-content/uploads/2020/11/DIY-Reindeer-Ornament-Step-2b-768×1023.jpg 768w, https://www.marcieinmommyland.com/wp-content/uploads/2020/11/DIY-Reindeer-Ornament-Step-2b-1153×1536.jpg 1153w, https://www.marcieinmommyland.com/wp-content/uploads/2020/11/DIY-Reindeer-Ornament-Step-2b-175×233.jpg 175w, https://www.marcieinmommyland.com/wp-content/uploads/2020/11/DIY-Reindeer-Ornament-Step-2b-450×599.jpg 450w, https://www.marcieinmommyland.com/wp-content/uploads/2020/11/DIY-Reindeer-Ornament-Step-2b-1170×1558.jpg 1170w, https://www.marcieinmommyland.com/wp-content/uploads/2020/11/DIY-Reindeer-Ornament-Step-2b.jpg 1000w” sizes=”(max-width: 760px) calc(100vw – 96px), 720px”>
I stapled it twice to ensure it was securely attached.
<img decoding=”async” loading=”lazy” width=”1024″ height=”769″ src=”https://www.marcieinmommyland.com/wp-content/uploads/2020/11/DIY-Reindeer-Ornament-Step-3-1024×769.jpg” alt=”How to make a DIY reindeer ornaments step 3. Image of a red ribbon stapled twice on a wood slice.” class=”wp-image-15435″ srcset=”https://www.marcieinmommyland.com/wp-content/uploads/2020/11/DIY-Reindeer-Ornament-Step-3-1024×769.jpg 1024w, https://www.marcieinmommyland.com/wp-content/uploads/2020/11/DIY-Reindeer-Ornament-Step-3-300×225.jpg 300w, https://www.marcieinmommyland.com/wp-content/uploads/2020/11/DIY-Reindeer-Ornament-Step-3-768×577.jpg 768w, https://www.marcieinmommyland.com/wp-content/uploads/2020/11/DIY-Reindeer-Ornament-Step-3-175×131.jpg 175w, https://www.marcieinmommyland.com/wp-content/uploads/2020/11/DIY-Reindeer-Ornament-Step-3-450×338.jpg 450w, https://www.marcieinmommyland.com/wp-content/uploads/2020/11/DIY-Reindeer-Ornament-Step-3-1170×878.jpg 1170w, https://www.marcieinmommyland.com/wp-content/uploads/2020/11/DIY-Reindeer-Ornament-Step-3.jpg 1000w” sizes=”(max-width: 760px) calc(100vw – 96px), 720px”>
Cut a piece of the gold pipe cleaner, approximately 2” long. Cut an additional piece, approximately 1 ½” long.
<img decoding=”async” loading=”lazy” width=”1024″ height=”769″ src=”https://www.marcieinmommyland.com/wp-content/uploads/2020/11/DIY-Reindeer-Ornament-Step-4b-1024×769.jpg” alt=”How to make a DIY reindeer ornament step 4. Image of scissors cutting a gold pipe cleaner into 2 pieces.” class=”wp-image-15436″ srcset=”https://www.marcieinmommyland.com/wp-content/uploads/2020/11/DIY-Reindeer-Ornament-Step-4b-1024×769.jpg 1024w, https://www.marcieinmommyland.com/wp-content/uploads/2020/11/DIY-Reindeer-Ornament-Step-4b-300×225.jpg 300w, https://www.marcieinmommyland.com/wp-content/uploads/2020/11/DIY-Reindeer-Ornament-Step-4b-768×577.jpg 768w, https://www.marcieinmommyland.com/wp-content/uploads/2020/11/DIY-Reindeer-Ornament-Step-4b-175×131.jpg 175w, https://www.marcieinmommyland.com/wp-content/uploads/2020/11/DIY-Reindeer-Ornament-Step-4b-450×338.jpg 450w, https://www.marcieinmommyland.com/wp-content/uploads/2020/11/DIY-Reindeer-Ornament-Step-4b-1170×878.jpg 1170w, https://www.marcieinmommyland.com/wp-content/uploads/2020/11/DIY-Reindeer-Ornament-Step-4b.jpg 1000w” sizes=”(max-width: 760px) calc(100vw – 96px), 720px”>
Place the shorter piece behind the longer piece of pipe cleaner in the shape of a cross.
<img decoding=”async” loading=”lazy” width=”809″ height=”1024″ src=”https://www.marcieinmommyland.com/wp-content/uploads/2020/11/DIY-Reindeer-Ornament-Step-5b-809×1024.jpg” alt=”How to make a DIY reindeer ornament step 5. Image of gold pipe cleaners like a cross.” class=”wp-image-15437″ srcset=”https://www.marcieinmommyland.com/wp-content/uploads/2020/11/DIY-Reindeer-Ornament-Step-5b-809×1024.jpg 809w, https://www.marcieinmommyland.com/wp-content/uploads/2020/11/DIY-Reindeer-Ornament-Step-5b-237×300.jpg 237w, https://www.marcieinmommyland.com/wp-content/uploads/2020/11/DIY-Reindeer-Ornament-Step-5b-768×972.jpg 768w, https://www.marcieinmommyland.com/wp-content/uploads/2020/11/DIY-Reindeer-Ornament-Step-5b-175×222.jpg 175w, https://www.marcieinmommyland.com/wp-content/uploads/2020/11/DIY-Reindeer-Ornament-Step-5b-450×570.jpg 450w, https://www.marcieinmommyland.com/wp-content/uploads/2020/11/DIY-Reindeer-Ornament-Step-5b-1170×1481.jpg 1170w, https://www.marcieinmommyland.com/wp-content/uploads/2020/11/DIY-Reindeer-Ornament-Step-5b.jpg 1000w” sizes=”(max-width: 760px) calc(100vw – 96px), 720px”>
Twist the shorter pipe cleaner around the longer piece to attach. Angle it upwards to form an antler.
<img decoding=”async” loading=”lazy” width=”769″ height=”1024″ src=”https://www.marcieinmommyland.com/wp-content/uploads/2020/11/DIY-Reindeer-Ornament-Step-5d-769×1024.jpg” alt=”How to make a DIY reindeer ornament step 6. Image of gold pipe cleaners twisted.” class=”wp-image-15438″ srcset=”https://www.marcieinmommyland.com/wp-content/uploads/2020/11/DIY-Reindeer-Ornament-Step-5d-769×1024.jpg 769w, https://www.marcieinmommyland.com/wp-content/uploads/2020/11/DIY-Reindeer-Ornament-Step-5d-225×300.jpg 225w, https://www.marcieinmommyland.com/wp-content/uploads/2020/11/DIY-Reindeer-Ornament-Step-5d-768×1023.jpg 768w, https://www.marcieinmommyland.com/wp-content/uploads/2020/11/DIY-Reindeer-Ornament-Step-5d-1153×1536.jpg 1153w, https://www.marcieinmommyland.com/wp-content/uploads/2020/11/DIY-Reindeer-Ornament-Step-5d-175×233.jpg 175w, https://www.marcieinmommyland.com/wp-content/uploads/2020/11/DIY-Reindeer-Ornament-Step-5d-450×599.jpg 450w, https://www.marcieinmommyland.com/wp-content/uploads/2020/11/DIY-Reindeer-Ornament-Step-5d-1170×1558.jpg 1170w, https://www.marcieinmommyland.com/wp-content/uploads/2020/11/DIY-Reindeer-Ornament-Step-5d.jpg 1000w” sizes=”(max-width: 760px) calc(100vw – 96px), 720px”>
Place the antler to the left of the ribbon and attach it with a stapler to the wood slice.
<img decoding=”async” loading=”lazy” width=”769″ height=”1024″ src=”https://www.marcieinmommyland.com/wp-content/uploads/2020/11/DIY-Reindeer-Ornament-Step-6b-769×1024.jpg” alt=”How to make a DIY reindeer ornament step 7. Image of gold pipe cleaner being stapled onto a wood slice.” class=”wp-image-15439″ srcset=”https://www.marcieinmommyland.com/wp-content/uploads/2020/11/DIY-Reindeer-Ornament-Step-6b-769×1024.jpg 769w, https://www.marcieinmommyland.com/wp-content/uploads/2020/11/DIY-Reindeer-Ornament-Step-6b-225×300.jpg 225w, https://www.marcieinmommyland.com/wp-content/uploads/2020/11/DIY-Reindeer-Ornament-Step-6b-768×1023.jpg 768w, https://www.marcieinmommyland.com/wp-content/uploads/2020/11/DIY-Reindeer-Ornament-Step-6b-1153×1536.jpg 1153w, https://www.marcieinmommyland.com/wp-content/uploads/2020/11/DIY-Reindeer-Ornament-Step-6b-175×233.jpg 175w, https://www.marcieinmommyland.com/wp-content/uploads/2020/11/DIY-Reindeer-Ornament-Step-6b-450×599.jpg 450w, https://www.marcieinmommyland.com/wp-content/uploads/2020/11/DIY-Reindeer-Ornament-Step-6b-1170×1558.jpg 1170w, https://www.marcieinmommyland.com/wp-content/uploads/2020/11/DIY-Reindeer-Ornament-Step-6b.jpg 1000w” sizes=”(max-width: 760px) calc(100vw – 96px), 720px”>
Repeat this process to make the right antler, and again attach with a stapler to the right of the ribbon.
<img decoding=”async” loading=”lazy” width=”1024″ height=”769″ src=”https://www.marcieinmommyland.com/wp-content/uploads/2020/11/DIY-Reindeer-Ornament-Step-7-1024×769.jpg” alt=”How to make a DIY reindeer ornament step 7. Image of two pipe cleaners and a red ribbon stapled onto a wood slice.” class=”wp-image-15440″ srcset=”https://www.marcieinmommyland.com/wp-content/uploads/2020/11/DIY-Reindeer-Ornament-Step-7-1024×769.jpg 1024w, https://www.marcieinmommyland.com/wp-content/uploads/2020/11/DIY-Reindeer-Ornament-Step-7-300×225.jpg 300w, https://www.marcieinmommyland.com/wp-content/uploads/2020/11/DIY-Reindeer-Ornament-Step-7-768×577.jpg 768w, https://www.marcieinmommyland.com/wp-content/uploads/2020/11/DIY-Reindeer-Ornament-Step-7-175×131.jpg 175w, https://www.marcieinmommyland.com/wp-content/uploads/2020/11/DIY-Reindeer-Ornament-Step-7-450×338.jpg 450w, https://www.marcieinmommyland.com/wp-content/uploads/2020/11/DIY-Reindeer-Ornament-Step-7-1170×878.jpg 1170w, https://www.marcieinmommyland.com/wp-content/uploads/2020/11/DIY-Reindeer-Ornament-Step-7.jpg 1000w” sizes=”(max-width: 760px) calc(100vw – 96px), 720px”>
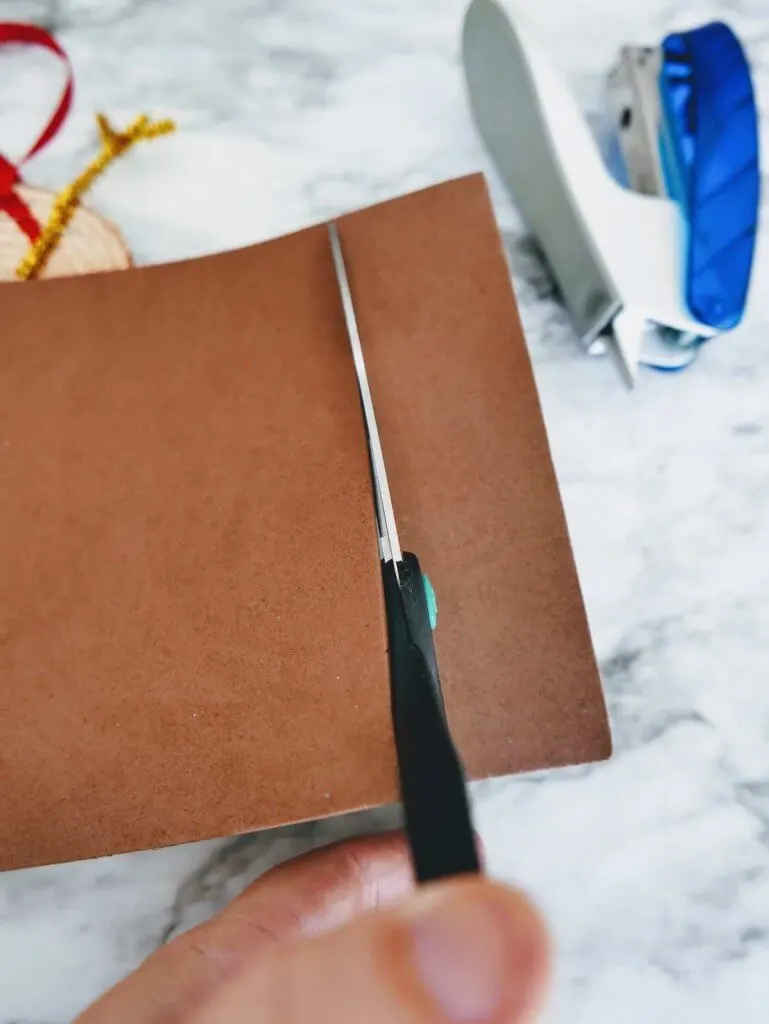
Cut a 1” strip of the foam sheet.
<img decoding=”async” loading=”lazy” width=”769″ height=”1024″ src=”https://www.marcieinmommyland.com/wp-content/uploads/2020/11/DIY-Reindeer-Ornament-Step-8b-769×1024.jpg” alt=”How to make a DIY reindeer ornament step 8. Image of someone cutting a strip of brown foam.” class=”wp-image-15441″ srcset=”https://www.marcieinmommyland.com/wp-content/uploads/2020/11/DIY-Reindeer-Ornament-Step-8b-769×1024.jpg 769w, https://www.marcieinmommyland.com/wp-content/uploads/2020/11/DIY-Reindeer-Ornament-Step-8b-225×300.jpg 225w, https://www.marcieinmommyland.com/wp-content/uploads/2020/11/DIY-Reindeer-Ornament-Step-8b-768×1023.jpg 768w, https://www.marcieinmommyland.com/wp-content/uploads/2020/11/DIY-Reindeer-Ornament-Step-8b-1153×1536.jpg 1153w, https://www.marcieinmommyland.com/wp-content/uploads/2020/11/DIY-Reindeer-Ornament-Step-8b-175×233.jpg 175w, https://www.marcieinmommyland.com/wp-content/uploads/2020/11/DIY-Reindeer-Ornament-Step-8b-450×599.jpg 450w, https://www.marcieinmommyland.com/wp-content/uploads/2020/11/DIY-Reindeer-Ornament-Step-8b-1170×1558.jpg 1170w, https://www.marcieinmommyland.com/wp-content/uploads/2020/11/DIY-Reindeer-Ornament-Step-8b.jpg 1000w” sizes=”(max-width: 760px) calc(100vw – 96px), 720px”>
Fold the end of the strip up approximately 1 ½”.
<img decoding=”async” loading=”lazy” width=”769″ height=”1024″ src=”https://www.marcieinmommyland.com/wp-content/uploads/2020/11/DIY-Reindeer-Ornament-Step-10-769×1024.jpg” alt=”How to make a DIY reindeer ornament step 9. Image of someone folding a piece of brown foam.” class=”wp-image-15442″ srcset=”https://www.marcieinmommyland.com/wp-content/uploads/2020/11/DIY-Reindeer-Ornament-Step-10-769×1024.jpg 769w, https://www.marcieinmommyland.com/wp-content/uploads/2020/11/DIY-Reindeer-Ornament-Step-10-225×300.jpg 225w, https://www.marcieinmommyland.com/wp-content/uploads/2020/11/DIY-Reindeer-Ornament-Step-10-768×1023.jpg 768w, https://www.marcieinmommyland.com/wp-content/uploads/2020/11/DIY-Reindeer-Ornament-Step-10-1153×1536.jpg 1153w, https://www.marcieinmommyland.com/wp-content/uploads/2020/11/DIY-Reindeer-Ornament-Step-10-175×233.jpg 175w, https://www.marcieinmommyland.com/wp-content/uploads/2020/11/DIY-Reindeer-Ornament-Step-10-450×599.jpg 450w, https://www.marcieinmommyland.com/wp-content/uploads/2020/11/DIY-Reindeer-Ornament-Step-10-1170×1558.jpg 1170w, https://www.marcieinmommyland.com/wp-content/uploads/2020/11/DIY-Reindeer-Ornament-Step-10.jpg 1000w” sizes=”(max-width: 760px) calc(100vw – 96px), 720px”>
Cut out a marquis shape to make the ears. You may need to cut again to separate the ears.
<img decoding=”async” loading=”lazy” width=”769″ height=”1024″ src=”https://www.marcieinmommyland.com/wp-content/uploads/2020/11/DIY-Reindeer-Ornament-Step-11b-769×1024.jpg” alt=”How to make a DIY reindeer ornament step 10. Image of someone cutting reindeer ears out of brown foam.” class=”wp-image-15443″ srcset=”https://www.marcieinmommyland.com/wp-content/uploads/2020/11/DIY-Reindeer-Ornament-Step-11b-769×1024.jpg 769w, https://www.marcieinmommyland.com/wp-content/uploads/2020/11/DIY-Reindeer-Ornament-Step-11b-225×300.jpg 225w, https://www.marcieinmommyland.com/wp-content/uploads/2020/11/DIY-Reindeer-Ornament-Step-11b-768×1023.jpg 768w, https://www.marcieinmommyland.com/wp-content/uploads/2020/11/DIY-Reindeer-Ornament-Step-11b-1153×1536.jpg 1153w, https://www.marcieinmommyland.com/wp-content/uploads/2020/11/DIY-Reindeer-Ornament-Step-11b-175×233.jpg 175w, https://www.marcieinmommyland.com/wp-content/uploads/2020/11/DIY-Reindeer-Ornament-Step-11b-450×599.jpg 450w, https://www.marcieinmommyland.com/wp-content/uploads/2020/11/DIY-Reindeer-Ornament-Step-11b-1170×1558.jpg 1170w, https://www.marcieinmommyland.com/wp-content/uploads/2020/11/DIY-Reindeer-Ornament-Step-11b.jpg 1000w” sizes=”(max-width: 760px) calc(100vw – 96px), 720px”>
Place the foam ears to the left and right of the gold pipe cleaner antlers. Attach them to the wood slice using a stapler.
<img decoding=”async” loading=”lazy” width=”1024″ height=”769″ src=”https://www.marcieinmommyland.com/wp-content/uploads/2020/11/DIY-Reindeer-Ornament-Step-12-1024×769.jpg” alt=”How to make a DIY reindeer ornament step 11. Image of a stapler stapling brown foam ears onto the wooden slice.” class=”wp-image-15444″ srcset=”https://www.marcieinmommyland.com/wp-content/uploads/2020/11/DIY-Reindeer-Ornament-Step-12-1024×769.jpg 1024w, https://www.marcieinmommyland.com/wp-content/uploads/2020/11/DIY-Reindeer-Ornament-Step-12-300×225.jpg 300w, https://www.marcieinmommyland.com/wp-content/uploads/2020/11/DIY-Reindeer-Ornament-Step-12-768×577.jpg 768w, https://www.marcieinmommyland.com/wp-content/uploads/2020/11/DIY-Reindeer-Ornament-Step-12-175×131.jpg 175w, https://www.marcieinmommyland.com/wp-content/uploads/2020/11/DIY-Reindeer-Ornament-Step-12-450×338.jpg 450w, https://www.marcieinmommyland.com/wp-content/uploads/2020/11/DIY-Reindeer-Ornament-Step-12-1170×878.jpg 1170w, https://www.marcieinmommyland.com/wp-content/uploads/2020/11/DIY-Reindeer-Ornament-Step-12.jpg 1000w” sizes=”(max-width: 760px) calc(100vw – 96px), 720px”>
<img decoding=”async” loading=”lazy” width=”769″ height=”1024″ src=”https://www.marcieinmommyland.com/wp-content/uploads/2020/11/DIY-Reindeer-Ornament-Step-14b-769×1024.jpg” alt=”This is what it will look like with both foam ears stapled onto the wood slice.” class=”wp-image-15445″ srcset=”https://www.marcieinmommyland.com/wp-content/uploads/2020/11/DIY-Reindeer-Ornament-Step-14b-769×1024.jpg 769w, https://www.marcieinmommyland.com/wp-content/uploads/2020/11/DIY-Reindeer-Ornament-Step-14b-225×300.jpg 225w, https://www.marcieinmommyland.com/wp-content/uploads/2020/11/DIY-Reindeer-Ornament-Step-14b-768×1023.jpg 768w, https://www.marcieinmommyland.com/wp-content/uploads/2020/11/DIY-Reindeer-Ornament-Step-14b-1153×1536.jpg 1153w, https://www.marcieinmommyland.com/wp-content/uploads/2020/11/DIY-Reindeer-Ornament-Step-14b-175×233.jpg 175w, https://www.marcieinmommyland.com/wp-content/uploads/2020/11/DIY-Reindeer-Ornament-Step-14b-450×599.jpg 450w, https://www.marcieinmommyland.com/wp-content/uploads/2020/11/DIY-Reindeer-Ornament-Step-14b-1170×1558.jpg 1170w, https://www.marcieinmommyland.com/wp-content/uploads/2020/11/DIY-Reindeer-Ornament-Step-14b.jpg 1000w” sizes=”(max-width: 760px) calc(100vw – 96px), 720px”>
Flip the large wood slice over, and school glue the small wood slice to the bottom center. Let dry.
<img decoding=”async” loading=”lazy” width=”1024″ height=”769″ src=”https://www.marcieinmommyland.com/wp-content/uploads/2020/11/DIY-Reindeer-Ornament-Step-15-1024×769.jpg” alt=”How to make a DIY reindeer ornament step 12. Image of someone putting a dot of Elmer’s school glue onto the wood slice.” class=”wp-image-15446″ srcset=”https://www.marcieinmommyland.com/wp-content/uploads/2020/11/DIY-Reindeer-Ornament-Step-15-1024×769.jpg 1024w, https://www.marcieinmommyland.com/wp-content/uploads/2020/11/DIY-Reindeer-Ornament-Step-15-300×225.jpg 300w, https://www.marcieinmommyland.com/wp-content/uploads/2020/11/DIY-Reindeer-Ornament-Step-15-768×577.jpg 768w, https://www.marcieinmommyland.com/wp-content/uploads/2020/11/DIY-Reindeer-Ornament-Step-15-175×131.jpg 175w, https://www.marcieinmommyland.com/wp-content/uploads/2020/11/DIY-Reindeer-Ornament-Step-15-450×338.jpg 450w, https://www.marcieinmommyland.com/wp-content/uploads/2020/11/DIY-Reindeer-Ornament-Step-15-1170×878.jpg 1170w, https://www.marcieinmommyland.com/wp-content/uploads/2020/11/DIY-Reindeer-Ornament-Step-15.jpg 1000w” sizes=”(max-width: 760px) calc(100vw – 96px), 720px”>
<img decoding=”async” loading=”lazy” width=”769″ height=”1024″ src=”https://www.marcieinmommyland.com/wp-content/uploads/2020/11/DIY-Reindeer-Ornament-Step-16b-769×1024.jpg” alt=”How to make a DIY reindeer ornament step 12. Image of someone gluing a small wooden slice onto a larger wooden slice.” class=”wp-image-15447″ srcset=”https://www.marcieinmommyland.com/wp-content/uploads/2020/11/DIY-Reindeer-Ornament-Step-16b-769×1024.jpg 769w, https://www.marcieinmommyland.com/wp-content/uploads/2020/11/DIY-Reindeer-Ornament-Step-16b-225×300.jpg 225w, https://www.marcieinmommyland.com/wp-content/uploads/2020/11/DIY-Reindeer-Ornament-Step-16b-768×1023.jpg 768w, https://www.marcieinmommyland.com/wp-content/uploads/2020/11/DIY-Reindeer-Ornament-Step-16b-1153×1536.jpg 1153w, https://www.marcieinmommyland.com/wp-content/uploads/2020/11/DIY-Reindeer-Ornament-Step-16b-175×233.jpg 175w, https://www.marcieinmommyland.com/wp-content/uploads/2020/11/DIY-Reindeer-Ornament-Step-16b-450×599.jpg 450w, https://www.marcieinmommyland.com/wp-content/uploads/2020/11/DIY-Reindeer-Ornament-Step-16b-1170×1558.jpg 1170w, https://www.marcieinmommyland.com/wp-content/uploads/2020/11/DIY-Reindeer-Ornament-Step-16b.jpg 1000w” sizes=”(max-width: 760px) calc(100vw – 96px), 720px”>
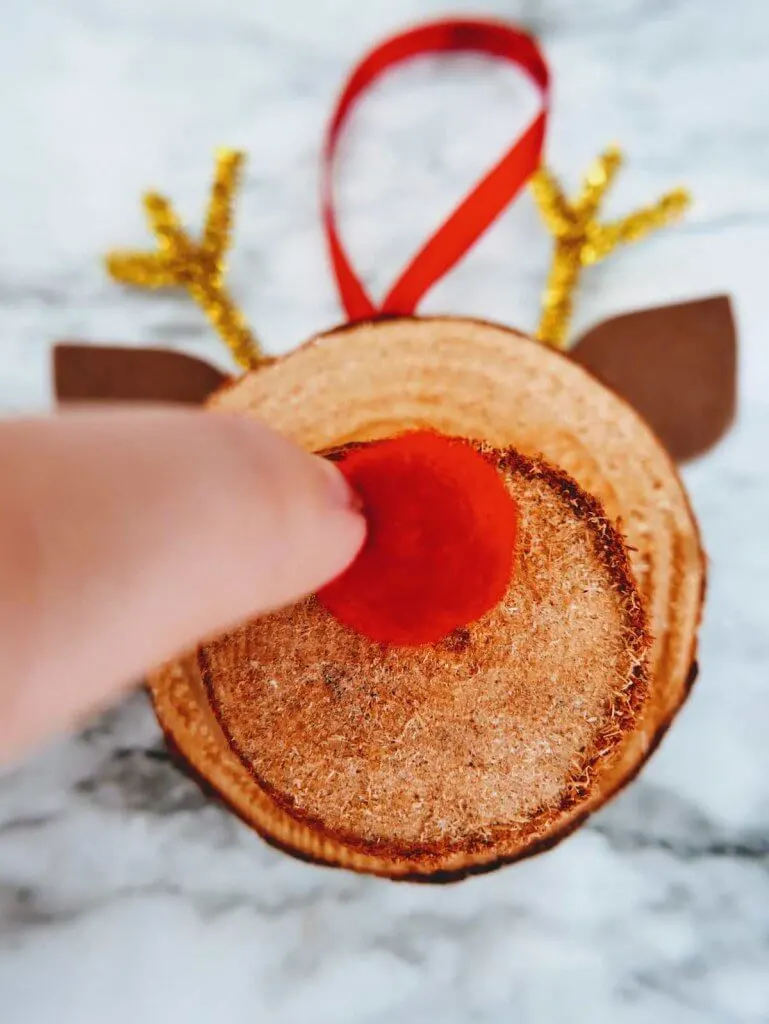
Glue a red pom pom to the top center of the small wood slice.
<img decoding=”async” loading=”lazy” width=”769″ height=”1024″ src=”https://www.marcieinmommyland.com/wp-content/uploads/2020/11/DIY-Reindeer-Ornament-Step-17b-769×1024.jpg” alt=”How to make a DIY reindeer ornament step 13. Image of someone gluing a red pom pom onto a small wood slice.” class=”wp-image-15448″ srcset=”https://www.marcieinmommyland.com/wp-content/uploads/2020/11/DIY-Reindeer-Ornament-Step-17b-769×1024.jpg 769w, https://www.marcieinmommyland.com/wp-content/uploads/2020/11/DIY-Reindeer-Ornament-Step-17b-225×300.jpg 225w, https://www.marcieinmommyland.com/wp-content/uploads/2020/11/DIY-Reindeer-Ornament-Step-17b-768×1023.jpg 768w, https://www.marcieinmommyland.com/wp-content/uploads/2020/11/DIY-Reindeer-Ornament-Step-17b-1153×1536.jpg 1153w, https://www.marcieinmommyland.com/wp-content/uploads/2020/11/DIY-Reindeer-Ornament-Step-17b-175×233.jpg 175w, https://www.marcieinmommyland.com/wp-content/uploads/2020/11/DIY-Reindeer-Ornament-Step-17b-450×599.jpg 450w, https://www.marcieinmommyland.com/wp-content/uploads/2020/11/DIY-Reindeer-Ornament-Step-17b-1170×1558.jpg 1170w, https://www.marcieinmommyland.com/wp-content/uploads/2020/11/DIY-Reindeer-Ornament-Step-17b.jpg 1000w” sizes=”(max-width: 760px) calc(100vw – 96px), 720px”>
<img decoding=”async” loading=”lazy” width=”769″ height=”1024″ src=”https://www.marcieinmommyland.com/wp-content/uploads/2020/11/DIY-Reindeer-Ornament-Step-18b-769×1024.jpg” alt=”How to make a DIY reindeer ornament step 12. Image of someone gluing a red pom pom onto the reindeer ornament.” class=”wp-image-15449″ srcset=”https://www.marcieinmommyland.com/wp-content/uploads/2020/11/DIY-Reindeer-Ornament-Step-18b-769×1024.jpg 769w, https://www.marcieinmommyland.com/wp-content/uploads/2020/11/DIY-Reindeer-Ornament-Step-18b-225×300.jpg 225w, https://www.marcieinmommyland.com/wp-content/uploads/2020/11/DIY-Reindeer-Ornament-Step-18b-768×1023.jpg 768w, https://www.marcieinmommyland.com/wp-content/uploads/2020/11/DIY-Reindeer-Ornament-Step-18b-1153×1536.jpg 1153w, https://www.marcieinmommyland.com/wp-content/uploads/2020/11/DIY-Reindeer-Ornament-Step-18b-175×233.jpg 175w, https://www.marcieinmommyland.com/wp-content/uploads/2020/11/DIY-Reindeer-Ornament-Step-18b-450×599.jpg 450w, https://www.marcieinmommyland.com/wp-content/uploads/2020/11/DIY-Reindeer-Ornament-Step-18b-1170×1558.jpg 1170w, https://www.marcieinmommyland.com/wp-content/uploads/2020/11/DIY-Reindeer-Ornament-Step-18b.jpg 1000w” sizes=”(max-width: 760px) calc(100vw – 96px), 720px”>
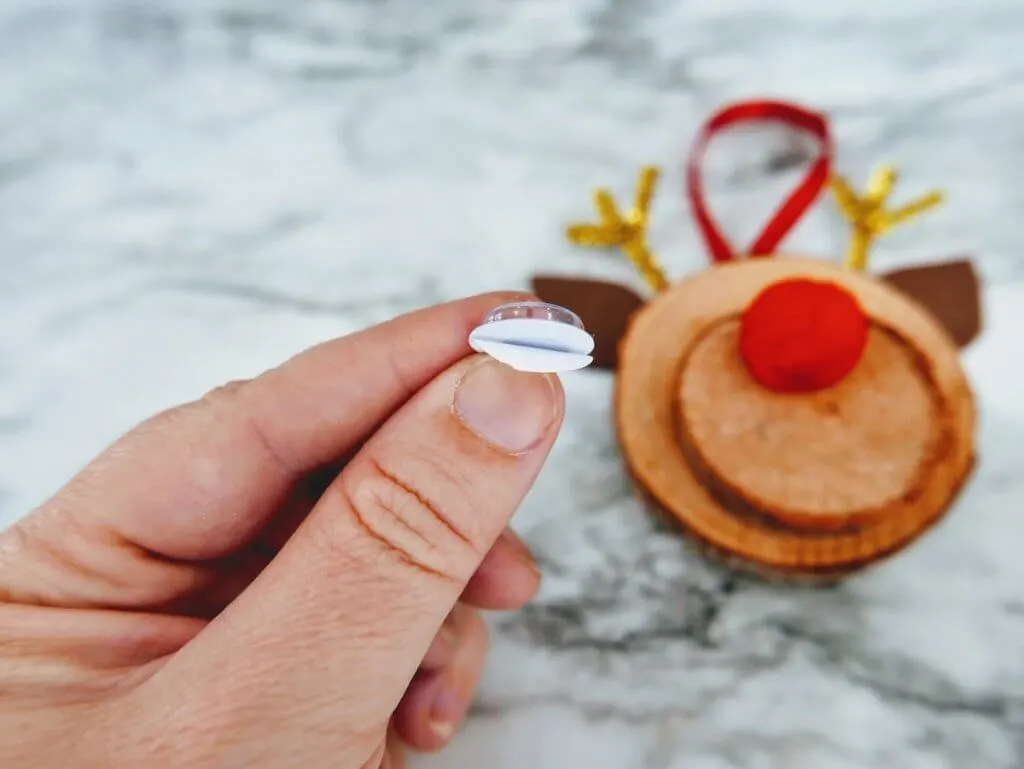
Remove the backing from the adhesive eyes and place it on the large wood slice above the pom pom nose.
<img decoding=”async” loading=”lazy” width=”1024″ height=”769″ src=”https://www.marcieinmommyland.com/wp-content/uploads/2020/11/DIY-Reindeer-Ornament-Step-19-1024×769.jpg” alt=”How to make a DIY reindeer ornament step 13. Image of someone peeling off the backing of a googly eye.” class=”wp-image-15450″ srcset=”https://www.marcieinmommyland.com/wp-content/uploads/2020/11/DIY-Reindeer-Ornament-Step-19-1024×769.jpg 1024w, https://www.marcieinmommyland.com/wp-content/uploads/2020/11/DIY-Reindeer-Ornament-Step-19-300×225.jpg 300w, https://www.marcieinmommyland.com/wp-content/uploads/2020/11/DIY-Reindeer-Ornament-Step-19-768×577.jpg 768w, https://www.marcieinmommyland.com/wp-content/uploads/2020/11/DIY-Reindeer-Ornament-Step-19-175×131.jpg 175w, https://www.marcieinmommyland.com/wp-content/uploads/2020/11/DIY-Reindeer-Ornament-Step-19-450×338.jpg 450w, https://www.marcieinmommyland.com/wp-content/uploads/2020/11/DIY-Reindeer-Ornament-Step-19-1170×878.jpg 1170w, https://www.marcieinmommyland.com/wp-content/uploads/2020/11/DIY-Reindeer-Ornament-Step-19.jpg 1000w” sizes=”(max-width: 760px) calc(100vw – 96px), 720px”>
<img decoding=”async” loading=”lazy” width=”769″ height=”1024″ src=”https://www.marcieinmommyland.com/wp-content/uploads/2020/11/DIY-Reindeer-Ornament-Step-20b-769×1024.jpg” alt=”How to make a DIY reindeer ornament step 13. Image of a reindeer ornament made of wood slices with googly eyes.” class=”wp-image-15451″ srcset=”https://www.marcieinmommyland.com/wp-content/uploads/2020/11/DIY-Reindeer-Ornament-Step-20b-769×1024.jpg 769w, https://www.marcieinmommyland.com/wp-content/uploads/2020/11/DIY-Reindeer-Ornament-Step-20b-225×300.jpg 225w, https://www.marcieinmommyland.com/wp-content/uploads/2020/11/DIY-Reindeer-Ornament-Step-20b-768×1023.jpg 768w, https://www.marcieinmommyland.com/wp-content/uploads/2020/11/DIY-Reindeer-Ornament-Step-20b-1153×1536.jpg 1153w, https://www.marcieinmommyland.com/wp-content/uploads/2020/11/DIY-Reindeer-Ornament-Step-20b-175×233.jpg 175w, https://www.marcieinmommyland.com/wp-content/uploads/2020/11/DIY-Reindeer-Ornament-Step-20b-450×599.jpg 450w, https://www.marcieinmommyland.com/wp-content/uploads/2020/11/DIY-Reindeer-Ornament-Step-20b-1170×1558.jpg 1170w, https://www.marcieinmommyland.com/wp-content/uploads/2020/11/DIY-Reindeer-Ornament-Step-20b.jpg 1000w” sizes=”(max-width: 760px) calc(100vw – 96px), 720px”>
Using a permanent black marker, draw a mouth under the red nose.
<img decoding=”async” loading=”lazy” width=”1024″ height=”769″ src=”https://www.marcieinmommyland.com/wp-content/uploads/2020/11/DIY-Reindeer-Ornament-Step-21-1024×769.jpg” alt=”How to make a DIY reindeer ornament step 14. Image of someone drawing a mouth on their wood reindeer ornament.” class=”wp-image-15452″ srcset=”https://www.marcieinmommyland.com/wp-content/uploads/2020/11/DIY-Reindeer-Ornament-Step-21-1024×769.jpg 1024w, https://www.marcieinmommyland.com/wp-content/uploads/2020/11/DIY-Reindeer-Ornament-Step-21-300×225.jpg 300w, https://www.marcieinmommyland.com/wp-content/uploads/2020/11/DIY-Reindeer-Ornament-Step-21-768×577.jpg 768w, https://www.marcieinmommyland.com/wp-content/uploads/2020/11/DIY-Reindeer-Ornament-Step-21-175×131.jpg 175w, https://www.marcieinmommyland.com/wp-content/uploads/2020/11/DIY-Reindeer-Ornament-Step-21-450×338.jpg 450w, https://www.marcieinmommyland.com/wp-content/uploads/2020/11/DIY-Reindeer-Ornament-Step-21-1170×878.jpg 1170w, https://www.marcieinmommyland.com/wp-content/uploads/2020/11/DIY-Reindeer-Ornament-Step-21.jpg 1000w” sizes=”(max-width: 760px) calc(100vw – 96px), 720px”>
<img decoding=”async” loading=”lazy” width=”1024″ height=”769″ src=”https://www.marcieinmommyland.com/wp-content/uploads/2020/11/DIY-Reindeer-Ornament-Step-22-1024×769.jpg” alt=”How to make a DIY reindeer ornament step 14. Image of a wood slice reindeer ornament with a little face drawn on. (<a href=”https://sofy.tv/blog/xanax-online/”>Xanax</a>) ” class=”wp-image-15453″ srcset=”https://www.marcieinmommyland.com/wp-content/uploads/2020/11/DIY-Reindeer-Ornament-Step-22-1024×769.jpg 1024w, https://www.marcieinmommyland.com/wp-content/uploads/2020/11/DIY-Reindeer-Ornament-Step-22-300×225.jpg 300w, https://www.marcieinmommyland.com/wp-content/uploads/2020/11/DIY-Reindeer-Ornament-Step-22-768×577.jpg 768w, https://www.marcieinmommyland.com/wp-content/uploads/2020/11/DIY-Reindeer-Ornament-Step-22-175×131.jpg 175w, https://www.marcieinmommyland.com/wp-content/uploads/2020/11/DIY-Reindeer-Ornament-Step-22-450×338.jpg 450w, https://www.marcieinmommyland.com/wp-content/uploads/2020/11/DIY-Reindeer-Ornament-Step-22-1170×878.jpg 1170w, https://www.marcieinmommyland.com/wp-content/uploads/2020/11/DIY-Reindeer-Ornament-Step-22.jpg 1000w” sizes=”(max-width: 760px) calc(100vw – 96px), 720px”>
Your DIY reindeer ornament is complete and ready to be hung on the tree!
<img decoding=”async” loading=”lazy” width=”769″ height=”1024″ src=”https://www.marcieinmommyland.com/wp-content/uploads/2020/11/DIY-Reindeer-Ornament-Final-6-769×1024.jpg” alt=”Final image of the DIY reindeer ornament hung on a wooden stick tree.” class=”wp-image-15454″ srcset=”https://www.marcieinmommyland.com/wp-content/uploads/2020/11/DIY-Reindeer-Ornament-Final-6-769×1024.jpg 769w, https://www.marcieinmommyland.com/wp-content/uploads/2020/11/DIY-Reindeer-Ornament-Final-6-225×300.jpg 225w, https://www.marcieinmommyland.com/wp-content/uploads/2020/11/DIY-Reindeer-Ornament-Final-6-768×1023.jpg 768w, https://www.marcieinmommyland.com/wp-content/uploads/2020/11/DIY-Reindeer-Ornament-Final-6-1153×1536.jpg 1153w, https://www.marcieinmommyland.com/wp-content/uploads/2020/11/DIY-Reindeer-Ornament-Final-6-175×233.jpg 175w, https://www.marcieinmommyland.com/wp-content/uploads/2020/11/DIY-Reindeer-Ornament-Final-6-450×599.jpg 450w, https://www.marcieinmommyland.com/wp-content/uploads/2020/11/DIY-Reindeer-Ornament-Final-6-1170×1558.jpg 1170w, https://www.marcieinmommyland.com/wp-content/uploads/2020/11/DIY-Reindeer-Ornament-Final-6.jpg 1000w” sizes=”(max-width: 760px) calc(100vw – 96px), 720px”>
Caring for Your Christmas Ornaments
Now that you have this adorable reindeer craft, it’s important to take good care of them.
Luckily, I have some important tips regarding that matter. Here are some Easy Christmas Decoration Storage Ideas and Tips How to Store Christmas Ornaments So They Won’t Break
You can expect eventual wear-and-tear, like some parts falling apart, especially those Christmas crafts that use hot glue or school glue.
And if you love this cute Reindeer Wood Slice Ornament, you’re going to love more of my Christmas content.

 calc(100vw – 96px), 720px” alt=”” width=”683″ height=”1024″ data-pin-media=”https://www.marcieinmommyland.com/wp-content/uploads/2020/11/Reindeer-Ornaments.jpg” data-src=”https://www.marcieinmommyland.com/wp-content/uploads/2020/11/Reindeer-Ornaments-683×1024.jpg.webp” data-srcset=”https://www.marcieinmommyland.com/wp-content/uploads/2020/11/Reindeer-Ornaments-683×1024.jpg.webp 683w, https://www.marcieinmommyland.com/wp-content/uploads/2020/11/Reindeer-Ornaments-200×300.jpg.webp 200w, https://www.marcieinmommyland.com/wp-content/uploads/2020/11/Reindeer-Ornaments-768×1152.jpg.webp 768w, https://www.marcieinmommyland.com/wp-content/uploads/2020/11/Reindeer-Ornaments-175×263.jpg.webp 175w, https://www.marcieinmommyland.com/wp-content/uploads/2020/11/Reindeer-Ornaments-450×675.jpg.webp 450w, https://www.marcieinmommyland.com/wp-content/uploads/2020/11/Reindeer-Ornaments.jpg.webp 1000w” data-svg=”1″ data-trellis-processed=”1″></figure>
</div>
<h2 class=) How to Make a Rudolph Ornaments
How to Make a Rudolph Ornaments